How to automate Azure B2C custom policy deployment?

When you're using Azure AD B2C custom policies you most probably have created TrustedFrameworkBase.xml, TrustedFrameworkExtensions.xml, and ex. SignUpOrSignIn.xml files. These files always contain environment-specific references which are required to change during the deployment process.
Microsoft Docs has an article on how to deploy custom policies with Azure Pipelines but the article does not cover how to handle environment-specific variables in custom policy files. This blog post describes one example of how to automate Azure B2C custom policy deployment to different environments.
Environment specific settings
Common environment-specific settings in custom policy XML files
TrustFrameworkPolicy attributes are declared in every custom policy file so TenantId and PublicPolicyUri attributes are required to change.
<TrustFrameworkPolicy
  xmlns:xsi="http://www.w3.org/2001/XMLSchema-instance"
  xmlns:xsd="http://www.w3.org/2001/XMLSchema"
  xmlns="http://schemas.microsoft.com/online/cpim/schemas/2013/06"
  PolicySchemaVersion="0.3.0.0"
  TenantId="[CHANGE-THIS].onmicrosoft.com"
  PolicyId="B2C_1A_reset"
  PublicPolicyUri="http://[CHANGE-THIS].onmicrosoft.com/B2C_1A_reset"
  DeploymentMode="Production"
  UserJourneyRecorderEndpoint="urn:journeyrecorder:applicationinsights">
Also, the BasePolicy element has a TenantId child node whose value is required to change.
<BasePolicy>
    <TenantId>[CHANGE-THIS].onmicrosoft.com</TenantId>
    <PolicyId>B2C_1A_TrustFrameworkExtensions</PolicyId>
</BasePolicy>
UserJourney file-specific settings (ex. SignUpOrSignIn.xml)
If you're using Application Insight integration then the InstrumentationKey attribute value is required to change which is declared in the JourneyInsights element. Also, the DeveloperMode value must be changed to Production in a Production environment.
<UserJourneyBehaviors>
      <SingleSignOn Scope="Policy" />
      <JourneyInsights TelemetryEngine="ApplicationInsights" InstrumentationKey="[CHANGE-THIS]" DeveloperMode="Production" ClientEnabled="true" ServerEnabled="true" TelemetryVersion="1.0.0" />
    </UserJourneyBehaviors>
TrustFrameworkExtensions file-specific settings
Custom page layouts (=html files) are located in the blob storage so LoadUri is required to change.
<ContentDefinition Id="api.signuporsignin">
        <LoadUri>https://[CHANGE-THIS].blob.core.windows.net/pagelayouts/{Culture:RFC5646}/unified.html</LoadUri>
        <RecoveryUri>~/common/default_page_error.html</RecoveryUri>
        <DataUri>urn:com:microsoft:aad:b2c:elements:unifiedssp:1.0.0</DataUri>
        <Metadata>
          <Item Key="DisplayName">Signin and Signup</Item>
        </Metadata>
        <LocalizedResourcesReferences MergeBehavior="Prepend">
          <LocalizedResourcesReference Language="en" LocalizedResourcesReferenceId="api.signuporsignin.en" />
          <LocalizedResourcesReference Language="fi" LocalizedResourcesReferenceId="api.signuporsignin.fi" />
        </LocalizedResourcesReferences>
      </ContentDefinition>
If you're using external IDP providers or API endpoints you have to change at least URL's inside the ClaimsProvider element.
<ClaimsProvider>
      <Domain>[CHANGE-THIS]</Domain>
      <DisplayName>Third party IDP</DisplayName>
      <TechnicalProfiles>
        <TechnicalProfile Id="IDP-OAUTH">
          <DisplayName>IDP</DisplayName>
          <Protocol Name="OpenIdConnect" />
          <Metadata>
            <Item Key="ProviderName">IDP</Item>
            <Item Key="METADATA">https://[CHANGE-THIS]/.well-known/openid-configuration</Item>
            <Item Key="ValidTokenIssuerPrefixes">https://[CHANGE-THIS]</Item>
            <Item Key="IdTokenAudience">services.clientId</Item>
            <Item Key="DiscoverMetadataByTokenIssuer">true</Item>
            <Item Key="response_types">code</Item>
            <Item Key="response_mode">form_post</Item>
            <Item Key="scope">openid given_name family_name name phone_number email address</Item>
            <Item Key="HttpBinding">POST</Item>
            <Item Key="UsePolicyInRedirectUri">false</Item>
            <Item Key="client_id">services.clientId</Item>
            <Item Key="SingleLogoutEnabled">true</Item>
          </Metadata>
How to handle environment-specific custom policy configuration files?
Create base custom policy template files
1. Create the following base custom policy template files in another folder in your solution structure
- BaseTemplates\BASE-SignUpOrSignIn.xml
- BaseTemplates\BASE-TrustFrameworkBase.xml
- BaseTemplates\BASE-TrustFrameworkExtensions.xml
2. Add placeholders {PLACEHOLDER} to the BASE template files to places whose values are environment-specific and should be changed
<TrustFrameworkPolicy
  xmlns:xsi="http://www.w3.org/2001/XMLSchema-instance"
  xmlns:xsd="http://www.w3.org/2001/XMLSchema"
  xmlns="http://schemas.microsoft.com/online/cpim/schemas/2013/06"
  PolicySchemaVersion="0.3.0.0"
  TenantId="{B2CTENANT}.onmicrosoft.com"
  PolicyId="B2C_1A_{B2CENVIRONMENT}_signup_signin"
  PublicPolicyUri="http://{B2CTENANT}.onmicrosoft.com/B2C_1A_signup_signin"
  DeploymentMode="{DEPLOYMENTMODE}"
  UserJourneyRecorderEndpoint="urn:journeyrecorder:applicationinsights">
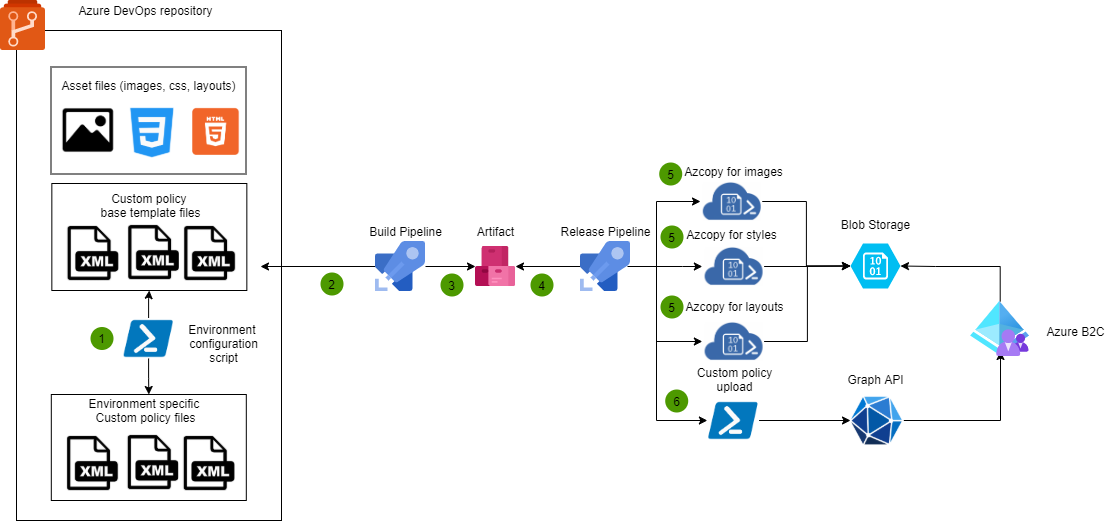
3. Implement PowerShell script which replaces placeholders with real environment-specific values and creates environment-specific template files
- Dev\Dev-SignUpOrSignIn.xml
- Dev\Dev-TrustFrameworkBase.xml
- Dev\Dev-TrustFrameworkExtensions.xml
- Test\Test-SignUpOrSignIn.xml
- Test\Test-TrustFrameworkBase.xml
- Test\Test-TrustFrameworkExtensions.xml
- Prod\Prod-SignUpOrSignIn.xml
- Prod\Prod-TrustFrameworkBase.xml
- Prod\Prod-TrustFrameworkExtensions.xml
Creation of these environment-specific files using PowerShell is also possible directly from the Azure DevOps Build Pipeline. When you're using this approach you can retrieve environment-specific values directly from Azure DevOps. Nothing sensitive information should not be saved to the custom policy files in any circumstances. This example uses an approach where environment-specific values (not sensitive information) are available in the PowerShell variables. This enables environment-specific files to be saved to the source control so version history is always available.
How to automate deployment by using Azure DevOps?
1. Create an Upload policy PowerShell script and store it to source control. Follow the example here.
2. Configure Build Pipeline using ex. YAML to create Artifact
3. Create a Release Pipeline with the following steps:
- Create AZCopy task to upload image files to Blob storage
- Create AZCopy task to upload style files to Blob storage
- Create AZCopy task to upload page layout files to Blob storage
- Create a PowerShell task to execute the upload policy script which was created in the first step
Overall picture how the automation works

Comments