Blazor Server App with Passwordless authentication

I recently noticed that Bitwarden which is known for the Password Manager product has started to offer a passwordless authentication service called Bitwarden Passwordless.dev. Bitwarden Passwordless.dev provides the API framework that minimizes complexities associated with passkey development. Bitwarden says, that enabling FIDO2 WebAuthn passkey features to the application takes just minutes.
Passwordless.dev wraps FIDO2 WebAuthn passkey functionality in easy-to-use tools, designed to make it faster for web developers to adopt passkey-based authentication, and meet the challenges of an ever-shifting cybersecurity landscape. Bitwarden Passwordless.dev
Bitwarden Passwordless.dev has Free, Pro, and Enterprise pricing tiers. The free tier supports one application per organization with up to 10,000 users. The pro tier costs 0,05 $ per user/month for the first 10,000 users and enables an unlimited number of applications. Read more details about pricing here.
Bitwarden has provided good API documentation and various Frontend and Backend implementation samples. This blog post shows, how to integrate Bitwarden Passwordless.dev passkey authentication to Blazor Server-based application. The application created in this blog post is a technology sample and is not ready for production.
What is FIDO2 WebAuthn passkey authentication?
Basically, FIDO authentication with passkeys is a key element to passwordless authentication. You don't anymore need a username and password which are vulnerable for phishing and credential stuffing. For further readings, I recommend checking passkeys.dev and yubikey.com.
W3C WebAuthn Community Adoption Group and the FIDO Alliance have determined passkey authentication as following in the passkeys.dev site:
Passkey enables that you can use your fingerprint or other biometric to log you into your websites or applications. Passkeys are proven to be resistant to phishing, credential stuffing, and other remote attacks. Passkeys are available whenever you need them, even if you replace your device
How to integrate Bitwarden Passwordless into the Blazor Server application?
This section shows, how to configure Bitwarden Passwordless passkey authentication to a server-based Blazor application.
Create Bitwarden organization and application
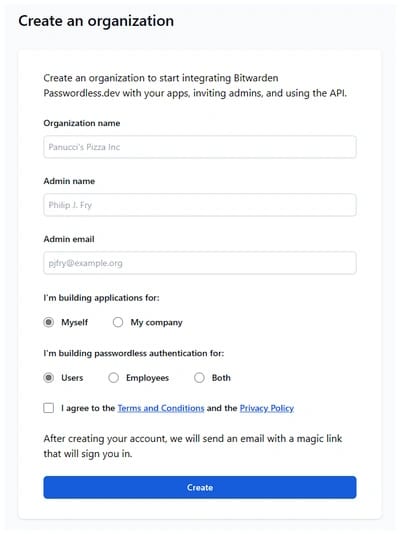
You need to first create the Bitwarden organization and application in the Bitwarden self-service portal.
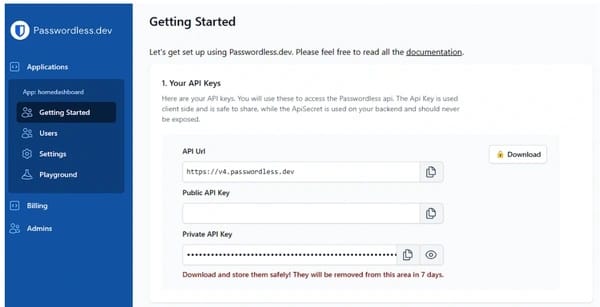
Bitwarden Passwordless API key will be revealed after the organization and application are created. Later API key will be added to the appsettings.json configuration of the Blazor application.
Configuration of Blazor Server-based Application
Configuration (appsettings.json)
The configuration contains an API public key for authentication and private secret which is required to communicate with Bitwarden Passwordless private API in the backend. Copy the API keys from the Bitwarden self-service portal to the configuration.
{
  "Passwordless": {
    "PublicApiKey": "",
    "ApiSecret": "",
    "VerifySignInTokenBackendUri": "/verify-signin",
    "RegisterTokenBackendUri": "/register-token"
  }
}
Cookie-based authentication
Cookie authentication is configured normally in Program.cs. Remember the right order of UseAuthentication(), UserRouting(), and UserAuthorization().
var builder = WebApplication.CreateBuilder(args);
builder.Services.AddAuthentication("Cookies").AddCookie();
var app = builder.Build();
app.UseAuthentication();
app.UseRouting();
app.UseAuthorization();
app.MapControllers();
app.MapBlazorHub();
app.MapFallbackToPage("/_Host");
app.Run();
Clien side implementation
The client side of the application uses Bitwarden Passwordless javascript SDK to orchestrate the sign-in and registration flow. I recommend you to read Bitwarden Passwordless documentation and diagrams about the sign-in and registration flows.
Injected Javascript libraries and global constants in the Layout template
Global javascript constants are handled in the main Layout template (_Layout.cshtml). This approach enables, configuration values can be dynamically changed from the main configuration file of the application (appsettings.json). Later these global javascript constants are used in the clientside implementation which orchestrates the sign-in and registration flow.
<!--Bitwarden Passwordless javascript library-->
<script crossorigin="anonymous" src="https://cdn.passwordless.dev/dist/1.1.0/umd/passwordless.umd.min.js"></script>
<!--Local logic to steer authentication and registration flow-->
<script src="scripts/passwordless.js"></script>

@{
    // Public API key for authentication
    var publicApiKey = string.Format("const API_KEY = '{0}'", Configuration["Passwordless:PublicApiKey"]);
    var verifySignInTokenBackendUri = string.Format("const VERIFY_SIGNIN_TOKEN_BACKEND_URI = '{0}'", Configuration["Passwordless:VerifySignInTokenBackendUri"]);
    var registerTokenBackendUri = string.Format("const REGISTER_TOKEN_BACKEND_URI = '{0}'", Configuration["Passwordless:RegisterTokenBackendUri"]);
}

<!--Render global constants-->
<script type="text/javascript">
    @Html.Raw(publicApiKey);
    @Html.Raw(verifySignInTokenBackendUri);
    @Html.Raw(registerTokenBackendUri);
</script>
Local javascript implementation
Local javascript implementation is located in a single file (/scripts/passwordless.js). This file has two methods that are responsible for steering the sign-in and registration flow.
Token registration function
The token registration function is responsible for fetching a registration token from the backend (/register-token) to authorize the creation of a passkey on the end-user's device. A complete description of the flow is described here.
async function registerToken(userData) {

    // Initiate the Passwordless client with your public api key.
    // API_KEY is a global constant which is determined in the _Layout.cshtml
    const p = new Passwordless.Client({
        apiKey: API_KEY
    });

    try {

        // Fetch the registration token from the backend (ASP.NET minimal API)
        // REGISTER_TOKEN_BACKEND_URI is a global constant which is determined in the _Layout.cshtml
        const registerToken = await fetch(REGISTER_TOKEN_BACKEND_URI,
            {
                method: "POST",
                headers: {
                    'Content-Type': 'application/json',
                },
                body: JSON.stringify(userData)
            }).then(r => r.json());

        // Register the token with the end-user's device.
        const { token, error } = await p.register(registerToken.token);

        if (token) {
            console.log("Successfully registered WebAuthn. You can now sign in!");
        } else {
            alert("Token registration failed", error);
        }

        return token;

    } catch (e) {
        console.error("Error occured while token registration", e);
    }
}
Start passkey discovery function
The function generates a verification token which will be checked by the backend to complete a sign-in. This sample uses sign-in with discovery which triggers the Browsers native UI prompt to select identity and sign in. You can find more information about other sign-in options in the documentation.
async function signinWithDiscoverable() {

    //Initiate the Passwordless client with your public api key.
    // API_KEY is a global constant which is determined in the _Layout.cshtml
    const p = new Passwordless.Client({
        apiKey: API_KEY,
    });

    try {

        // Enables browsers to suggest passkeys by opening a UI prompt (only works with discoverable passkeys)
        const { token, error } = await p.signinWithDiscoverable();

        if (error) {

            alert("Error occured during the sign-in or you cancelled the request.");
            console.log(error);
            return;
        }

        var signInTokenPayload = {
            "Token": token
        };

        // Call backend to verify the token.
        // VERIFY_SIGNIN_TOKEN_BACKEND_URI is a global constant which is determined in the _Layout.cshtml
        await fetch(VERIFY_SIGNIN_TOKEN_BACKEND_URI,
        {
            method: "POST",
            headers: {
                'Content-Type': 'application/json',
            },
            body: JSON.stringify(signInTokenPayload)
        }).then(function (res) {
            if (res.redirected) {
                window.location.href = res.url;
                return;
            }
        });

    } catch (e) {
        console.error("Error occured while sign in: ", e);
    }
}
Backend implementation
Backend implementation is responsible for communication towards Bitwarden Passwordless API with a Private API key. Necessary UI components are built with Razor.
Razor component
LoginForm.razor

LoginForm Razor component renders Login and Register links in the right top corner of the application. The register link navigates the user to a registration form and login starts the passkey authentication flow using the Bitwarden service.
@using Microsoft.JSInterop;
@inject IJSRuntime JSRuntime
@inject NavigationManager NavManager

<AuthorizeView Context="authContext">
    <Authorized>
        <p>Hello @authContext.User.Claims.First().Value</p>
        <NavLink class="btn btn-link active" @onclick="Logout">Logout</NavLink>
    </Authorized>
    <NotAuthorized>
        <NavLink class="btn btn-link active" @onclick="Login">Login</NavLink>
        <NavLink class="btn btn-link active" @onclick="Register">Register</NavLink>
    </NotAuthorized>
</AuthorizeView>

@code {

    private async void Login()
    {
        await JSRuntime.InvokeVoidAsync("signinWithDiscoverable");
    }

    private void Register()
    {
        NavManager.NavigateTo("/register");
    }

    private void Logout()
    {
        NavManager.NavigateTo("/logout");
    }
}
RegisterForm.razor
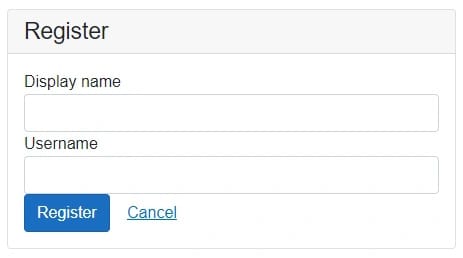
RegisterForm Razor component renders a registration form where the user can input the display name and username. Registration authorizes the creation of a passkey on the end-user's device.
@using Microsoft.JSInterop;
@using Passwordless.Blazor.App.Models;

@inject IJSRuntime JSRuntime
@inject NavigationManager NavManager

<div class="card">
    <h4 class="card-header">Register</h4>
    <div class="card-body">
        <EditForm Model="@model" OnValidSubmit="OnValidSubmit">
            <DataAnnotationsValidator />
            <div class="form-group">
                <label>Display name</label>
                <InputText @bind-Value="model.Displayname" class="form-control" />
                <ValidationMessage For="@(() => model.Displayname)" />
            </div>
            <div class="form-group">
                <label>Username</label>
                <InputText @bind-Value="model.Username" class="form-control" />
                <ValidationMessage For="@(() => model.Username)" />
            </div>
            <button class="btn btn-primary">Register</button>
            <NavLink href="/" class="btn btn-link">Cancel</NavLink>
        </EditForm>
    </div>
</div>

@code {
    private PasswordlessUser model = new PasswordlessUser();
    private bool loading;

    private async void OnValidSubmit()
    {
        loading = true;
        try
        {
            var token = await JSRuntime.InvokeAsync<string>("registerToken", model);

            if(!string.IsNullOrEmpty(token))
            {
                // Prompt login after successfull registration
                await JSRuntime.InvokeVoidAsync("signinWithDiscoverable");
            }
        }
        catch (Exception ex)
        {
            loading = false;
            StateHasChanged();
        }
    }
}
Authorized Razor components
Components that require authentication are wrapped around AuthorizeView.
<AuthorizeView>
    <Authorized>
        <h1>Weather forecast</h1>

<p>This component demonstrates fetching data from a service.</p>

@if (forecasts == null)
{
    <p><em>Loading...</em></p>
}
else
{
    <table class="table">
        <thead>
            <tr>
                <th>Date</th>
                <th>Temp. (C)</th>
                <th>Temp. (F)</th>
                <th>Summary</th>
            </tr>
        </thead>
        <tbody>
            @foreach (var forecast in forecasts)
            {
                <tr>
                    <td>@forecast.Date.ToShortDateString()</td>
                    <td>@forecast.TemperatureC</td>
                    <td>@forecast.TemperatureF</td>
                    <td>@forecast.Summary</td>
                </tr>
            }
        </tbody>
    </table>
}

    </Authorized>
</AuthorizeView>
Minimal API endpoints
These Minimal API endpoints are called from the passwordless javascript library (/script/passwordless.js). Endpoints utilize PasswordlessService to communicate with Bitwarden API.
Local SignIn via HttpContext and Identity Claims creation is handled here in a Minimal API because usage of IHttpContextAccessor/HttpContext directly or indirectly in the Razor components of Blazor Server apps is not recommended.
Blazor apps run outside of the ASP.NET Core pipeline context and therefore HttpContext isn't guaranteed to be available.
public static class EndpointRouteBuilderExtensions
{
    public static void MapLoginEndpoints(this IEndpointRouteBuilder endpoints, IPasswordlessService passwordlessLoginService)
    {
        endpoints.MapPost("/verify-signin", async (HttpContext httpContext, SignInToken name) =>
        {
            var token = await passwordlessLoginService.VerifySignInToken(name.Token);

            if(token == null)
            {
                return Results.Redirect("/error");
            }

            ClaimsIdentity claimsIdentity = new ClaimsIdentity(new List<Claim>
            {
                new Claim("sub", token.UserId)
            }, "CookieAuth");

            ClaimsPrincipal claims = new ClaimsPrincipal(claimsIdentity);

            await httpContext.SignInAsync(claims);

            return Results.Redirect("/");
        });

        endpoints.MapPost("/register-token", async (PasswordlessUser user) =>
        {
            var token = await passwordlessLoginService.RegisterTokenASync(user);
            return Results.Ok(token);
        });

        endpoints.MapGet("/logout", async (HttpContext httpContext) =>
        {
            await httpContext.SignOutAsync(CookieAuthenticationDefaults.AuthenticationScheme);
            return Results.Redirect("/");
        });
    }
}
PasswordlessService
PasswordlessService is responsible for backend-to-backend communication with Bitwarden Passwordless API. Bitwarden API requires an API secret which is retrieved when a new application is configured to the Bitwarden service.
public interface IPasswordlessService
{
    Task<TokenResponse?> RegisterTokenASync(PasswordlessUser user);
    Task<SigninResponse?> VerifySignInToken(string token);
}

public class PasswordlessService : IPasswordlessService
{
    private readonly HttpClient _httpClient;

    public PasswordlessLoginService(HttpClient httpClient)
    {
        _httpClient = httpClient;
    }

    public async Task<TokenResponse?> RegisterTokenASync(PasswordlessUser user)
    {
        var request = await _httpClient.PostAsJsonAsync("register/token", user);
        if (request.IsSuccessStatusCode)
        {
            return await request.Content.ReadFromJsonAsync<TokenResponse>();
        }
        return null;
    }

    public async Task<SigninResponse?> VerifySignInToken(string token)
    {
        var tokenPayload = new
        {
            token
        };

        var request = await _httpClient.PostAsJsonAsync("signin/verify", tokenPayload);

        if (request.IsSuccessStatusCode)
        {
            var signinResponse = await request.Content.ReadFromJsonAsync<SigninResponse>();
            if(signinResponse != null)
            {
                if (signinResponse.Success)
                {
                    return signinResponse;
                }
            }
        }
        return null;
    }
}
PasswordlessService is registered in DI using the named HttpClient. API Secret is retrieved from the application configuration (appsettings.json).
builder.Services.AddHttpClient<IPasswordlessService, PasswordlessService>(client =>
{
    client.BaseAddress = new Uri("https://v4.passwordless.dev/");
    client.DefaultRequestHeaders.Add("ApiSecret", builder.Configuration["Serverless:ApiSecret"]);
});
Registration and sign-in
Let's test the registration and sign-in user experience.
Registration
Display and username are given during the registration.
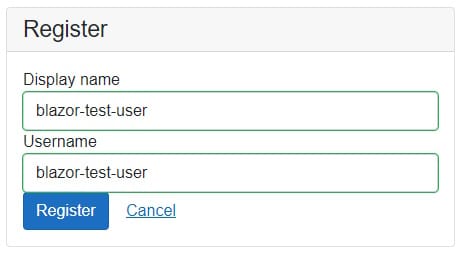
After submitting client-side SDK starts the passkey process and prompts you to choose the passkey solution that you prefer. In this case external security key is chosen.
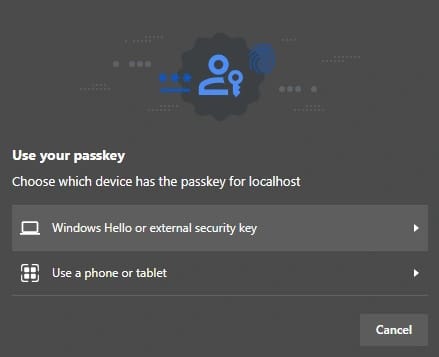
Next insert e.g. Yubikey security key into the USB port.
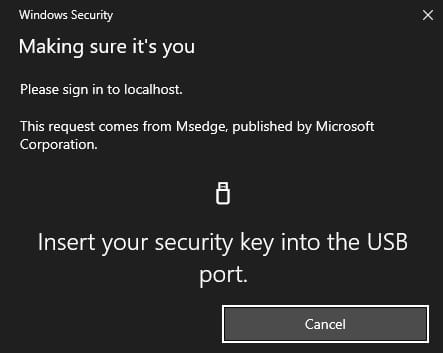
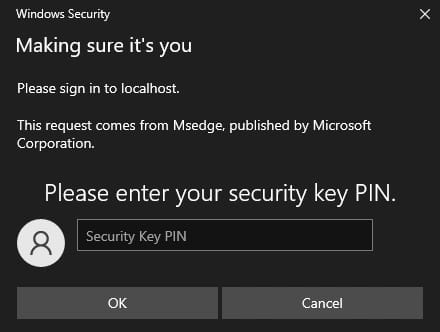
Enter your security key PIN which was determined during the security key setup and after that physical touch of the key is required.
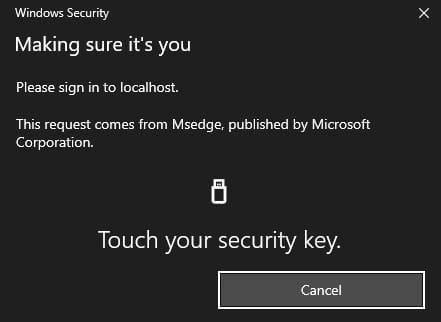
Login
The login process prompts a PIN and requires a physical touch of the security key. This sample uses sign-in with discovery which triggers the Browsers native UI prompt to select identity.

Summary
Enabling passkey authentication through Bitwarden Passwordless to the application was a straightforward operation. Good documentation and code samples supported the integration work a lot. The full source code of this application is available on GitHub.
Comments